Thursday, 29 September 2016

So I discovered a Wolf-Rayet star!

OK, I should admit right from the start that while I feel as though I have “discovered” a Wolf-Rayet star, it turns out to be very well-known to science, so I don’t think there is any chance that I will be invited to give it a name, less yet have it named after me!

(What’s a “Wolf-Rayet Star”? They are a class of extremely hot stars with unusual spectral signatures - while typical stars fuse hydrogen into helium, the Wolf-Rayets are busy fusing helium and heavier elements, so show bright emission lines for carbon, nitrogen and other heavier elements. Check out the Wikipedia article for a bit more information:  https://en.wikipedia.org/wiki/Wolf%E2%80%93Rayet_star )
So here’s the story of how it unfolded:

In my experimenting with backyard spectroscopy, I thought it would be interesting to capture a single spectral image with a group of several stars of comparable brightness but varying spectral classes, to illustrate the different spectral “signatures” side-by-side.

My first thought was to try a nice bright globular cluster, as there would be no shortage of stars - I aimed the telescope at 47 Tucanae (one of my favorite astronomical sights!), and grabbed a few spectra with varying exposures, but this turned out to be a bad choice for two reasons:

Firstly, there are simply too many stars (some millions of them), so all of the spectra just smear together into one fuzzy streak.

Secondly, like many globular clusters, it turns out that a very large fraction of its stars have very similar masses and compositions, so have very similar spectra, and the variation I was seeking to capture just isn’t there. (Sure, with a population of millions of stars, there are lots of “interesting” stars, but they are vastly outnumbered by the “boring” yellow G-class stars which make up the bulk of the population in 47 Tuc.)

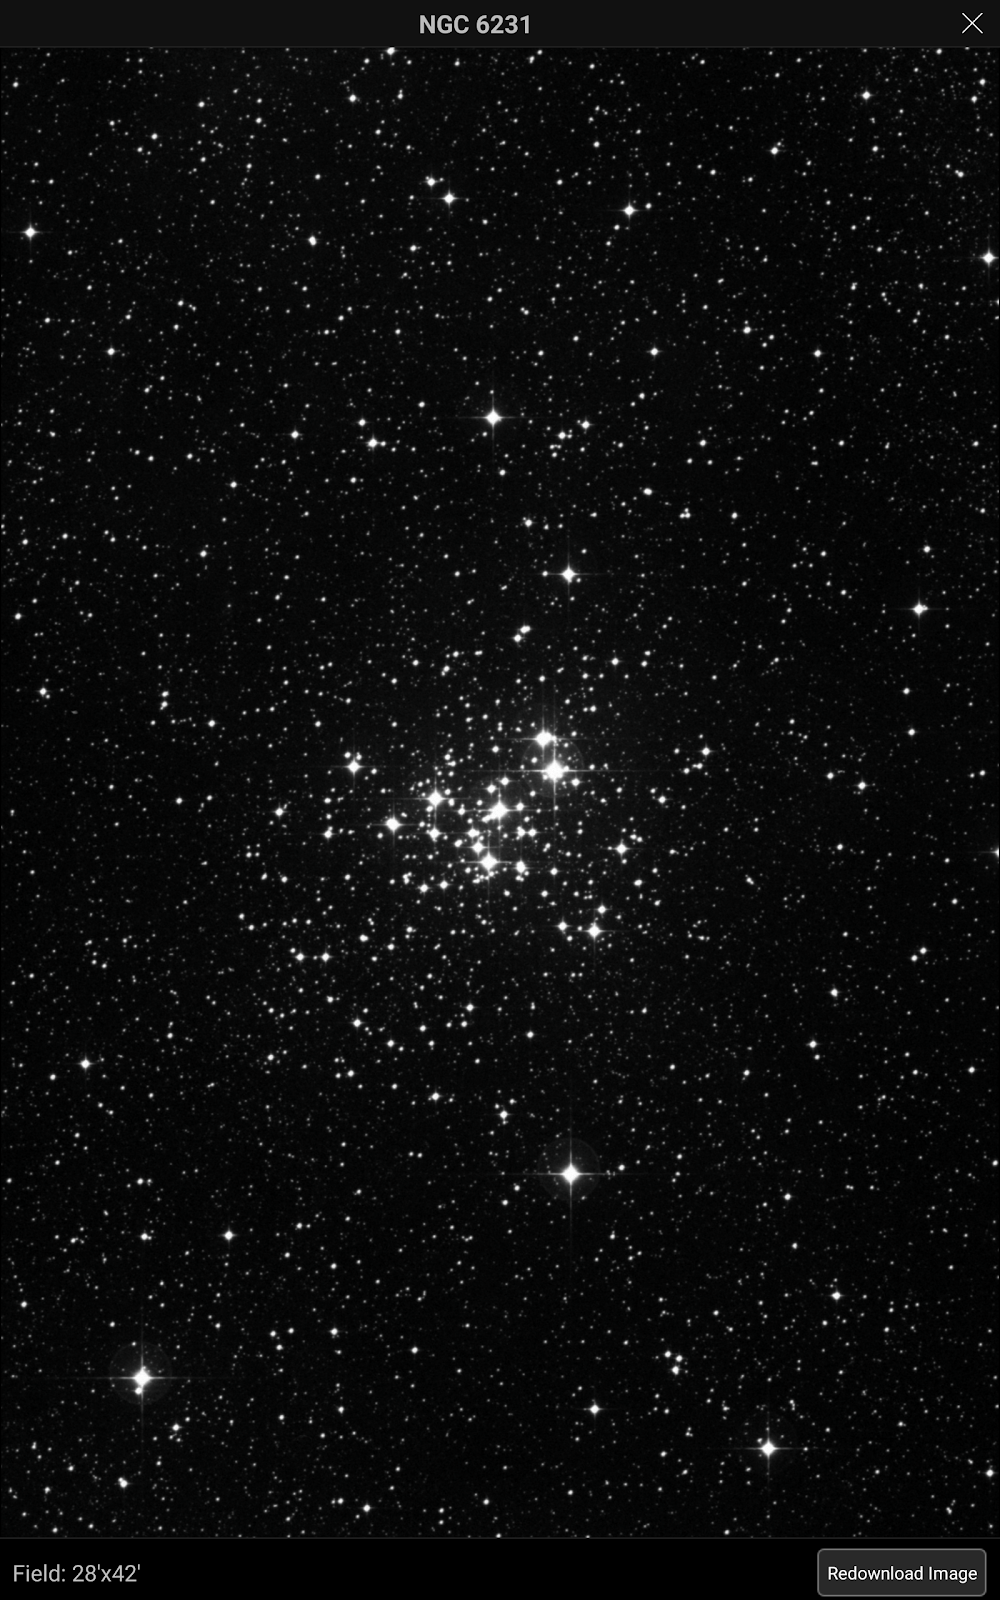
So what I needed was a small open cluster - small, because of the small capture area of my set-up (about 0.3 degrees wide x 0.24 degrees), and open, so that I might capture perhaps 10 comparably bright stars with their spectra, spread over the frame. A bit of a review of possible targets suggest NGC 6231 (a.k.a. Caldwell 76) as a good candidate - approximately 0.25 degrees across, and with a good spread of stars with Magnitude 6 to 7 approximately.

The following image is a DSS image of NGC 6231, showing an area of approximately ½ degree wide x ⅔ degree high (screen capture from SkySafari 5 Pro):
NGC 6231.png

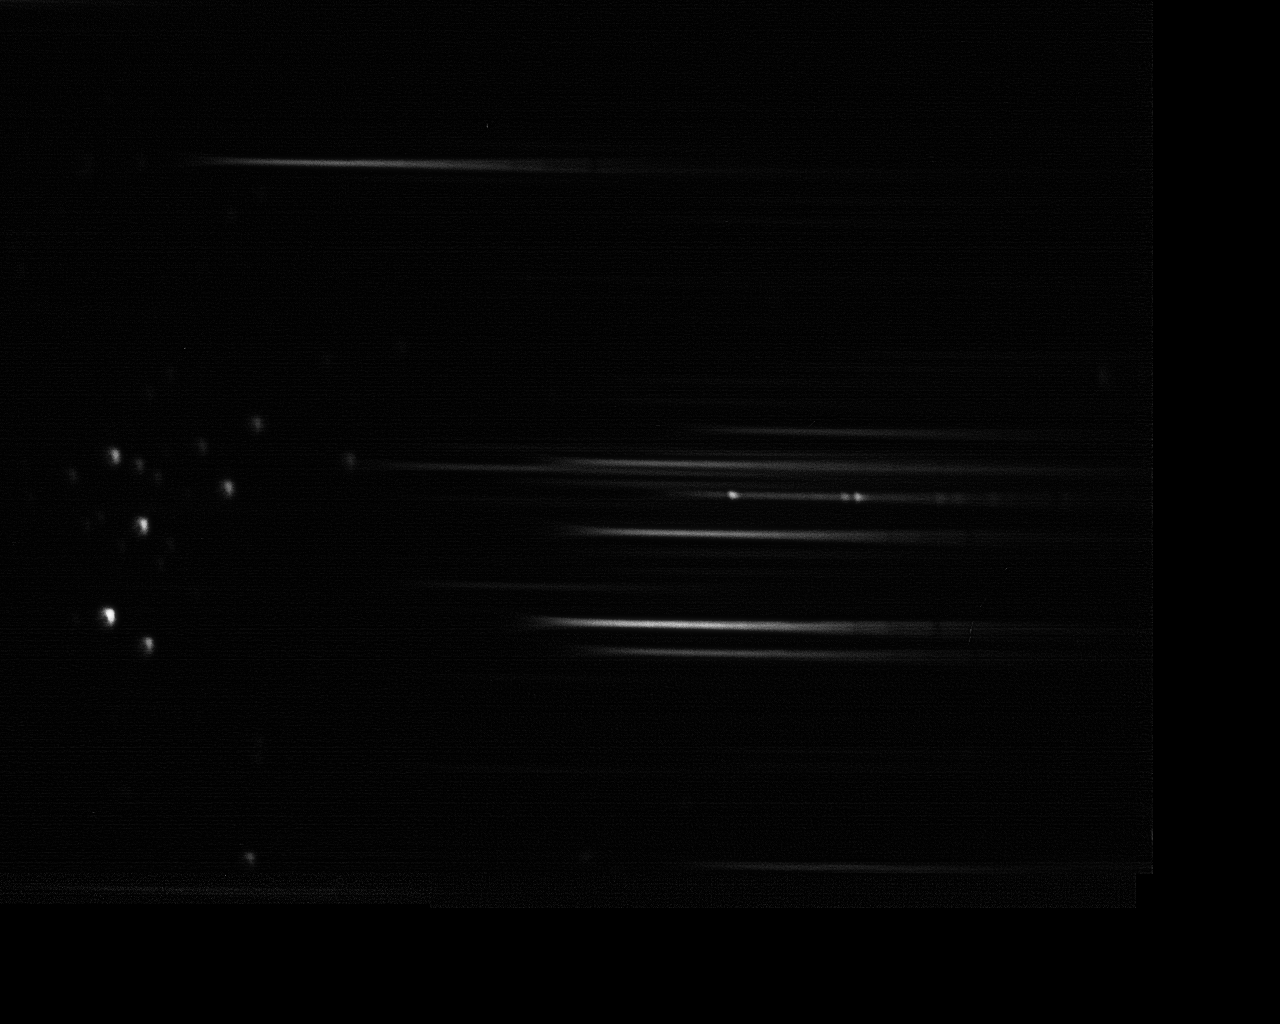
So I aimed the telescope, focused the camera with Star Analyser SA100 grating, and captured the resulting spectra - and this is what I saw:
BrightStars_205913 C76_g4_ap13_conv.png

At a quick glance, you can see about 12 stars on the left side of frame, with their spectra on the right of frame. (Even more stars and spectra can be extracted with a bit of post-processing and enhancement.)

As I was hoping, you can see a few different stellar “signatures” - some spectra are longer than others, some show some strong absorption lines, and so on - perfect, just what I was hoping for!

But look at the spectrum of the bright star at the mid-height of the frame - it looks very different to the others. You can see that it has several intense bright emission lines - what could this mean?

The first thing I need to do is to extract the spectrum of the target star from the field, so that it can be analysed in isolation, without being “polluted” by the spectra of the neighbouring stars. There are a few ways to go about this, but one handy trick is to open the spectral image in your favourite photo editing software, draw a selection rectangle around the spectrum of interest, and copy and paste this into a new image. Then, resize the spectrum strip image to be just one pixel high (without changing the width) - this creates a 1-pixel high spectrum which averages the brightness of all the pixels that were in each column of pixels in the source image. Now, resize it again to about 30 pixels high, and you should end up with something like this:

HR 6265.png

(Note that all image editing processes of this type can introduce “artefacts”, meaning you are losing some of your source data, and introducing some spurious “data”, but this approach should help you to get a useful spectral image which captures the main features well, at the possible expense of losing some of the fine detail, or introducing spurious fine data.)

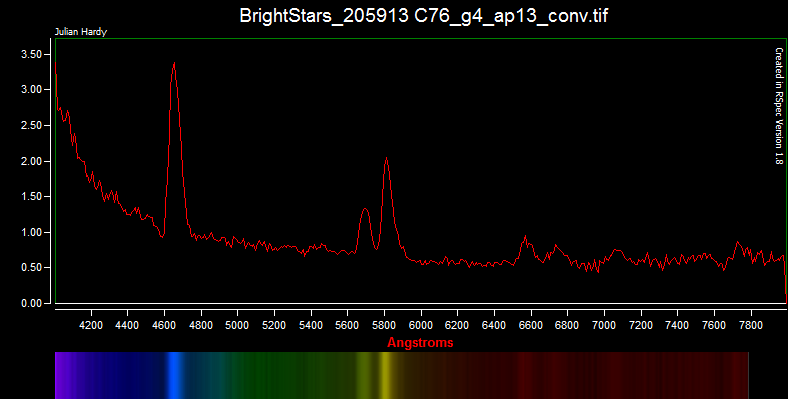
Now, I loaded my spectrum into RSpec, calibrated the wavelength scale, and corrected for instrument response, and we see the following spectrum:
HR 6265.png

Yes, those bright points that I saw in the original image have come through as strong emission lines, at wavelengths of about 4650, 5690, 5810, 6560 and 6730 Angstroms.

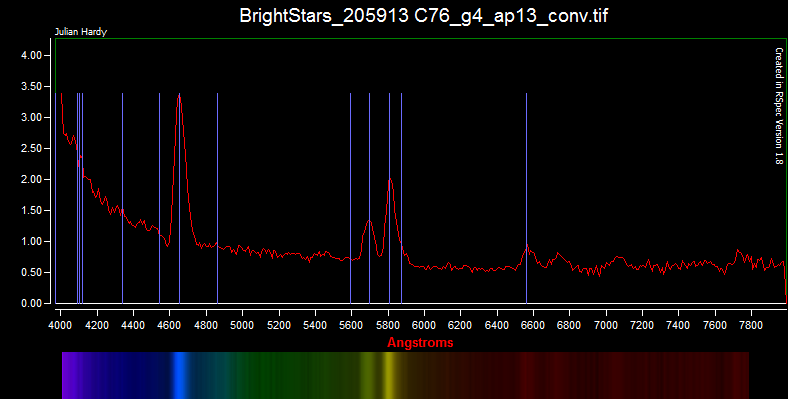
And when we superimpose the characteristic lines of a Class WC star, we see excellent correlation with 4 of the classic WC emission lines - the bright emission lines that I spotted correspond to Carbon emission at 4650, 5696 and 5805 Angstroms, and Hydrogen-alpha emission at 6563 Angstroms:
HR 6265 with WC Lines.png

So - mystery solved - Open Cluster NGC 6231 (C 76) contains a Wolf-Rayet star, with Spectral Class WC!

This was an exciting “discovery” for me (even more so than my “discovery” of methane on Neptune! http://julianh72.blogspot.com.au/2016/09/methane-in-neptunes-atmosphere-from-my.html ), so I started doing a bit of research - and discovered that NGC 6231 actually contains at least three Wolf-Rayet stars: HD 151932 (Mag. 6.48), HD 152270 (Mag. 6.61), and HD 152408 (Mag. 5.82). https://en.wikipedia.org/wiki/NGC_6231

Sure enough, my “discovery” turns out to be the well-documented HD 152270 (a.k.a. HR 6265). Oh well - I guess my first real discovery will have to wait for another day!

Nevertheless, I hope this little story expresses some of the genuine thrill that can be found in doing “real science” in your backyard!

Monday, 12 September 2016

Detecting Methane in Neptune's Atmosphere - from my Backyard!

I am capturing stellar spectra using a 200 mm Meade LX-90 telescope with 0.63 Focal Reducer (Effective Focal Ratio f/6.3), QHY5 mono camera, and a Star Analyser SA100 grating. The camera is mounted on a  “flip mirror” diagonal, which allows the telescope to be aligned visually with an eyepiece, and then the mirror is flipped out of the light path to the camera and grating.


IMG_20160910_004331.jpg


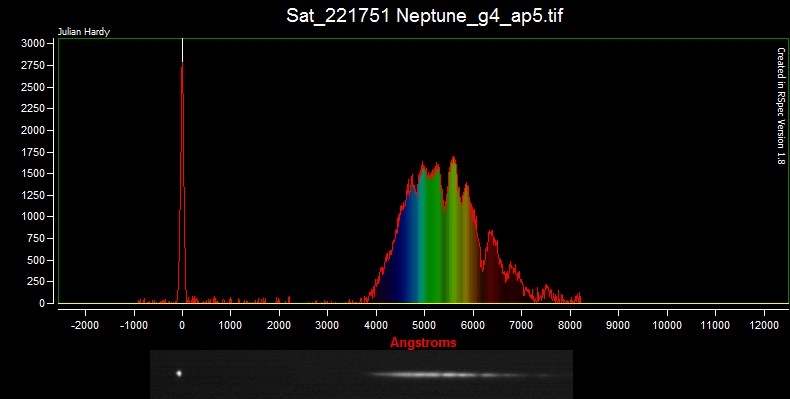
The following image is a stacked composite of 8 x 60-second frames captured on the evening of 25 August 2016 from my light-polluted backyard in suburban Brisbane (Australia). Neptune had an apparent visual magnitude of 7.8 at the time. (The exposure is reasonable, but for an improved quality spectrum for analysis, a longer capture session with a greater number of stacked frames would have helped.)


Neptune is at centre-left, with its spectrum spread across the centre of frame, and there are three other unidentified “field stars” visible in the frame. (Could the dim star just below and left of Neptune be Triton?)

Sat_221751 Neptune_g4_ap5 Cropped.jpg


There are some conspicuous dark absorption bands in the spectrum of Neptune - let’s see if we can work out what we’re looking at.

The spectrum image was loaded into the RSpec spectral analysis program, which reads the intensity of the image and produces a graph of intensity vs wavelength. (Note that even though the spectrum is captured in B&W, the software can synthesise the visible colours.)

Neptune - Stacked Frames - Uncorrected - With BW Spectrum.jpg


Neptune - Stacked Frames - Uncorrected.jpg


Note the “bell curve” shape of the spectrum plot - this is largely due to the varying sensitivity of the camera for different wavelengths. The camera is designed to capture visible light, with peak sensitivity in the green, diminishing sensitivity in the blue and red, very limited sensitivity in the Ultraviolet (< 4000 Å), and limited sensitivity in the Infrared (> 7500 Å).


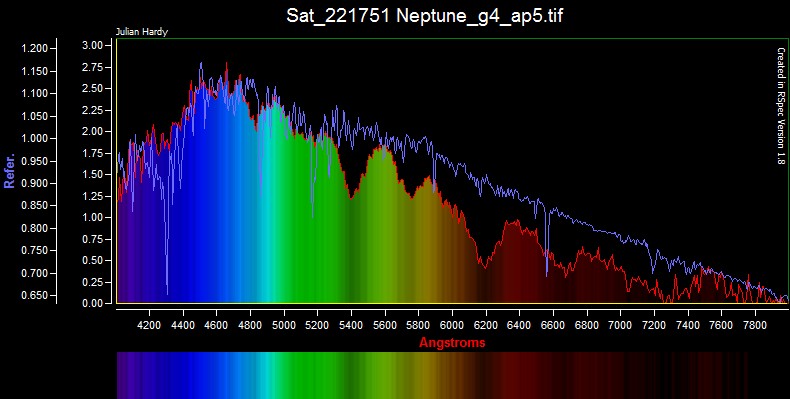
When we calibrate for the Instrument Response, we get the following graph, which better represents the ACTUAL relative intensity of the spectrum across the range of visible wavelengths.

Neptune - Corrected.jpg


Neptune shines in reflected sunlight - and the Sun is a Class G2V star. When we overlay a classic G2V spectrum, we can see that the spectrum of Neptune broadly follows the same shape, but there are some conspicuous absorption bands which are not seen in the Sun’s spectrum - what could these be?


Neptune - Corrected - with G2v.jpg


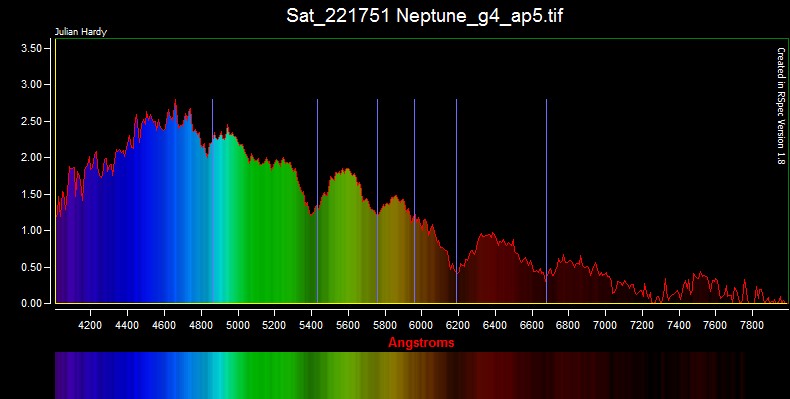
Methane is commonly known for its absorption in the infrared (hence its significance as a Greenhouse Gas in the Earth’s atmosphere), but it also has a number of absorption / emission lines in the visible spectrum, at wavelengths of 4860, 5430, 5760, 5960, 6190 & 6680 Å.


When we overlay these lines on the spectrum, we see an excellent correlation. Bingo! Neptune’s atmosphere is confirmed to contain a significant amount of Methane!

Neptune - Corrected - with Methane Lines.jpg

This may not come as any news to experienced planetary scientists (I don't think NASA needs to launch a mission to confirm my “findings”!), but I find it quite astonishing what can be accomplished by a very inexpert amateur with very modest equipment in their backyard!

Thursday, 26 May 2016

Yes, people really do 3D CAD on Mobile devices!

I've been using OnShape https://www.onshape.com/ as my primary 3D modelling package for some time now - both for designing parts for my hobby 3D printing and laser cutting, and also for general work (engineering) applications.


You can check out my early quick review here: http://julianh72.blogspot.com.au/2015/08/affordable-free-3d-modelling-software-5.html - and the more I've used it, the more impressed I've been.

I use OnShape primarily via Chrome browser on a Windows laptop (work or home) or a Windows tablet or a Chromebook, but I also use it on my Android tablet (and it is also available for iPads). What surprises many people is that OnShape can truly be used for full-featured 3D modelling (not just viewing) on mobile devices.


OnShape have just released a blog post "YES, PEOPLE REALLY DO CAD ON MOBILE!" https://www.onshape.com/cad-blog/yes-people-users-really-do-cad-on-mobile?utm_source=hs_email&utm_medium=email&utm_content=29936753&_hsenc=p2ANqtz-_jJNrK2qf9-xSiJlTvoqBOoscIhi_lDT2Vjq5p3JUpel2rp7KPKmYUU2SwkCkRlqVDaBJJ5WUiwAwE5vgIpQKm9UIODA&_hsmi=29936753 which gives some actual statistics which demonstrate that people really are using OnShape Mobile for modelling and design, not just viewing. While browser use is an order of magnitude bigger than mobile use (as you would expect), it is interesting to note that the usage patterns mimic each other on both platforms, except on weekends and holiday periods, where mobile use sees proportionately less of a dip than browser use - indicating it is the "platform of choice" for many users when you are away from the office.


If you are looking for a capable low-cost (free!) 3D modelling package for your hobby use, you really need to check out OnShape, if you have not done so already!

Thursday, 14 April 2016

Some reasonable planetary images with my ZWO ASI120MC camera

While seeing wasn't great from my home in inner-western Brisbane last night (13 April), it was nice and dark and clear, so I set up my Meade 200 mm LX90 (GoTo Alt-Az mount) with ZWO ASI120MC (one-shot colour camera) http://julianh72.blogspot.com.au/2014/09/zwo-asi120mc-planetary-camera-quick.html, and fired off a few 30-second video captures with FireCapture, and then stacked and sharpened in AutoStakkert to get the best images that I could.

Jupiter was nice and high in the sky:


And the Great Red Spot came into view nicely later in the evening:


Mars and Saturn were fairly low in the sky, sitting in the sky-glow of Brisbane City to the east (and directly over my roof), so while I'm fairly happy with these shots, I hope to get some better images in a couple of months when they're a bit higher as well.


My best videos were taken without a Barlow - I just couldn't seem to get quite as sharp focus with my 2x Barlow. Maybe I need to try focussing with a Bahtinov mask on a nearby star before pointing at my target?

These are the best of last night's efforts - they may not rival Hubble, but I'm pretty happy with them.

Thursday, 31 March 2016

Use your phone / tablet as a 3D printer?!

This 3D Printer concept uses your smartphone or tablet as the light source to cure photo-resins.


Virtually silent, runs off 4 x AA batteries.

And the best bit?

It's only $99 for the printer (build volume: 76 mm x 128 mm x 52 mm; vertical build rate of about 10 mm/hour or so), and $15 for a 100 mL bottle of resin (a range of hard and flexible resins available); prints with virtually no waste.

http://www.olo3d.net/
https://www.kickstarter.com/projects/olo3d/olo-the-first-ever-smartphone-3d-printer


I want one!

It sounds too good to be true - I'll believe this is a real thing when I see one actually working.

(But to quote “The X-Files”: I want to believe!)

Thursday, 17 December 2015

Netflix Socks - automatically pause your binge-watching if you fall asleep!

So the Paris Climate Conference went well, and we have apparently solved the problem of global warming - what's the next major problem humanity should tackle?

Well, it's obvious really:

You're binge-watching your favourite TV series on Netflix, you fall asleep, and you wake up two hours later having missed a couple of key episodes.

The good people at Netflix have a simple solution that you can make for yourself:

Netflix Socks http://makeit.netflix.com/netflix-socks


These amazing socks detect when you have dozed off, and send a pause signal to your TV / set-top box. A bright LED flashes a warning, so that you can press the over-ride button if you are awake and just happen to be sitting very still.

You can install the Netflix Socks adapter into your favourite pair of comfortable TV-watching socks, or you can download the knitting patterns to theme with your favourite Netflix shows, including Bloodline, Unbreakable Kimmy Schmidt, BoJack Horseman or House of Cards.


http://makeit.netflix.com/patterns/templates.zip

The parts list http://makeit.netflix.com/netflix_socks_materials_list.pdf is pretty simple:
You should be able to make yourself the adapter for a few dollars, or you may even already have most of the parts if you have tinkered with Arduino before.

Enjoy!

Friday, 27 November 2015

Survey results: "Color Vision and the Efficacy of EnChroma Glasses"

Blake Porter has published the results of his on-line survey http://www.blakeporterneuro.com/color-vision-efficacy-enchroma-glasses/ into the efficacy of EnChroma sunglasses as an aid for compensating for colour blindness. He previously published a fantastic piece entitled "What is color? Enchroma glasses, neuroscience, and the mystery of color" http://www.blakeporterneuro.com/enchroma-neuroscience-color/, which I mentioned in an earlier post http://julianh72.blogspot.com.au/2015/09/fantastic-article-on-enchroma-glasses.html - do take a look at this article, if you have not already done so - it is a fascinating read and very thought-provoking.

A total of 406 people responded to the survey, so it is a useful sample size. A significant majority of respondents were males in their twenties, which is not really surprising - males are more commonly affected by colour blindness than females, and the poll was conducted as an on-line survey, so some internet-savvy was required to even be aware of the poll, and then to complete it.

And the results of the survey?

In a nutshell - they really do work, for the majority of users.

http://i1.wp.com/www.blakeporterneuro.com/wp-content/uploads/2015/11/EnChroma-effective-time.png


You really need to read the whole article to get the full picture, but the Conclusion sums it up pretty well:

Conclusion

What we may conclude with some certainty is that people who have a language full of color words, are color blind, and then use corrective means to aid their color blindness, new conscious color perceptions are near instantaneous, possibly due to the broad processing capacity of the visual system, and there seems to be an intuition present, possibly due to knowledge from language, allowing these people to correctly assign their new colors with language. Overtime, their processing of new colors and their ability to discriminate across colors will be improved and the time course of this may be age dependent.

The work by Blake Porter is licensed under a Creative Commons Attribution-Non Commercial-ShareAlike 4.0 International License

Thursday, 26 November 2015

Ultrascope - Open-Source Automated Robotic Observatory

Here's one for the Geeks and Makers:

Ultrascope - an open-source Automated Robotic Observatory:
http://www.openspaceagency.com/ultrascope/
https://www.onshape.com/cad-blog/who-wants-to-go-hunting-for-asteroids


The Ultrascope project (currently in pre-Beta) aims to develop a kit-set robot telescope (or ARO - Automated Robotic Observatory), that will allow amateur astronomers to contribute to citizen science projects for a radically reduced cost - e.g. asteroid hunting, etc.

The first project is the Explorer Series Ultrascope, which is a 90 mm (3.5 inch) reflector ARO that is able to conduct celestial photography and photometry. The kit will be released as open-source plans for 3D printing or laser cutting, paired with an Arduino controller and a high-pixel smartphone (eg Lumia 1020 with 41 Megapixel CCD).


They are also working on a 200 mm (8") version, the Odyssey.


Tuesday, 27 October 2015

Things I wish somebody had told me when I started building a RepRap 3D Printer

Or to be more accurate:

Things people told me which I wish I had listened to more attentively when I started building a RepRap 3D Printer

My RepRap is a 1st-generation Prusa Mendel http://reprap.org/wiki/Prusa_Mendel_(iteration_1) which was pretty much the bee's knees in affordable DIY 3D printing back in August 2011 http://julianh72.blogspot.com.au/2011/08/first-post-inspirations.html.

I bought a kit of plastic bits and "vitamins " (nuts and bolts etc) on eBay, and self-sourced all of the other components (stepper motors, electronics, etc). The buy-and-build process was itself instructional (and fun!), and about two months after construction commenced, I had a workable 3D printer in operation. http://julianh72.blogspot.com.au/2011/10/cheers.html

The Prusa Mendel and its predecessors truly embodied one of the core philosophies of the RepRap Project: RepRap is short for Replicating Rapid-Prototyper; that is, the 3D printer can (almost) build itself. To this end, the maximum possible number of components were made from 3D-printed plastics, right down to the z-axis couplers and axis bushes.

These days, if you start a similar adventure, you are more likely to try building a 3rd-generation Prusa i3 http://reprap.org/wiki/Prusa or similar. To the uninitiated, it is hard to see how the Prusa i3 is directly related by just two generations from the Prusa Mendel, but for those of us "in the know", the family heritage is obvious.


1st-Generation Prusa Mendel (Ref: http://reprap.org/wiki/File:Assembled-prusa-mendel.jpg )

Current-generation (October 2015) Prusa i3 (Ref: http://reprap.org/wiki/File:Prusai3-metalframe.jpg )

The Prusa i3 (and other current-generation 3D printers) embody the accumulated learnings of both the originators of the RepRap Project, and thousands of RepRappers. The kits are cheaper than ever, but use a variety of materials and forms of construction, with less of an emphasis on using 3D printed materials for all components, for reduced cost and increased reliability / performance. (Steel or aluminium are just better at some jobs than plastic!)

Some may argue that this somehow "dilutes" the essence of RepRap, but for me, it makes the goal of ownership of an affordable and reliable 3D printer far more attainable, while still allowing freedom for experimentation and development/. (One of the great advantages of going down the open-source path, rather than buying a proprietary model, is that you can modify and upgrade your machine as often as you like, sharing your experience with that of many other like-minded individuals, so your humble beginnings can evolve into something better and better.)

In no particular order, here are my main learnings over the past few years:

  1. You NEED proper mechanical linear bearings on all axes - 3D-printed PLA bushings are a nice philosophical concept, but realistically, the motion will be MUCH smoother and jitter-free if you install linear bearings (LM8UU or similar). Do yourself a favour, and buy a kit which uses them (most modern kits do), of else, print yourself some replacement carriage parts which are designed for LM8UU bearings instead of PLA bushings, and install them as soon as possible. http://julianh72.blogspot.com.au/2011/11/smooth-operator.html
  2. You NEED a heated print-bed. Yes, it is possible to print on painter's tape etc, but life is MUCH easier when you have a heated print-bed. http://julianh72.blogspot.com.au/2011/12/hotbed-of-intrigue.html And this leads us to ...
  3. You need a power supply with heaps of capacity. I started off with a hacked ATX power-supply http://julianh72.blogspot.com.au/2011/08/my-parts-list-power-supply.html which I thought had enough capacity (16 amps @ 12 volts), and while it did work, it turned out that it had trouble maintaining full supply voltage under heavy load. I have replaced it with a more robust true 15-amp sustained (18-amp peak) power supply http://julianh72.blogspot.com.au/2015/10/powertech-mp-3800-0-24-volt-power.html , and it runs much better now.
  4. Get rid of the 3D-printed Z-axis couplers, and replace them with engineered metal shaft couplers. You can pick up 5 mm x 8 mm aluminium couplers for a couple of dollars on eBay, and I have found that they grip the smooth stepper motor shafts much better than a plastic clamp - of which, I printed and installed quite a few design variants http://julianh72.blogspot.com.au/2011/11/smooth-operator.html. (This is particularly important for a machine like the 1st-gen Prusa Mendel where the X-Axis is suspended from the Z-Axis motors; possibly less of an issue on the Prusa i3, where the motors are at the bottom, so the couplers are in compression, not tension.) They also run MUCH smoother, as they are able to take up the angular and offset errors between the motor and the threaded rod with a more reliable spring stiffness than the plastic clamp couplers.
  5. Get yourself an LCD Controller, like the RepRapDiscount Smart Controller http://reprap.org/wiki/RepRapDiscount_Smart_Controller - this will allow you to print without a computer attached, freeing up desk-space, and also removing one link from the failure chain. These can be bought very cheaply on eBay - highly recommended.
  6. If you are running an old-generation plastic-bodied print-head (PTFE and / or PEEK), replace it with an all-metal print-head with a heat-sink and fan. These run MUCH more reliably than the old PTFE-bodied print heads, and are also much more physically robust, and are able to withstand the occasional (and inevitable) print-head crash.

My 1st-generation Prusa Mendel has had all of the above upgrades applied to it - it is still physically the same arrangement as it stared life, but it now prints much more reliably and smoothly (and faster) than it did before. Dare I think that the "tinker and upgrade" phase has ended, and my RepRap will now enter a long mature life of production printing without significant additional upgrades?

(Naaah! Who am I kidding?! Of course I'll keep upgrading it - just watch this space!)

(As in all matters of opinion, some of these points may be controversial - for example, I am sure that some people have printed very successfully with 3D-printed PLA bushings, and continue to do so, but in my opinion, you are more likely to print successfully, and much more quickly, if you use linear bearings on all axes.)


Friday, 23 October 2015

PowerTech MP-3800 0-24 volt power supply - a quick review

I have been powering my RepRap 3D printer with a hacked ATX power supply http://julianh72.blogspot.com.au/2011/08/my-parts-list-power-supply.html - it has been working OK, but I was finding that it could be a bit slow getting the heat bed up to a stable temperature, especially if I want to print ABS (which needs a very hot heat-bed to stick properly). When I hooked up my multimeter, I found the supply voltage was dropping a bit under heavy load, so I guess my power supply really wasn't 100% up to its rated capacity. I started thinking about getting a proper desktop variable voltage power supply.

Luckily for me, JayCar recently had a special on several power supplies, including the MP-3800 http://www.jaycar.com.au/Power-Products-Electrical/Power-Supply/Laboratory-Bench/Compact-Switchmode-Laboratory-Power-Supply/p/MP3800, which they were offering for only AUD$119 (usually $149) - not bad for a 0-24 volt power supply, with a load rating of 15 amps continuous at 12 volts (18 amps peak). It is rated to better than 9 mV ripple voltage, and has thermal and overload protection, so it ticks all of my boxes.

Note that the rated output current capacity depends on the selected output voltage, so check your needs if you plan to run at other voltages:


So I grabbed one, hooked it up to my RepRap, and it works great - highly recommended!

The power supply has back-lit analogue gauges for volts and amps, which seem to be pretty accurate when I test against my multi-meter. The RepRap pulls a maximum load of about 12 amps during the heat-up phase, but this drops to around 5 - 6 amps during normal printing. The power supply handles this admirably, with no detectable fluctuation in supply voltage, even when the load is fluctuating rapidly, such as when the heat-bed is cycling on and off.

The voltage control knob has a central detent position, at which it delivers 13.2 volts, which is where I normally run the RepRap. (The RAMPS 1.4 card is nominally a 12 volt board, but it can happily take a little bit of over-voltage, and the extra supply voltage gives faster and more stable heat control.) However, I need to be sure to not accidentally overload the RAMPS by giving it 24 volts - I really wanted a digital display to give a crystal-clear voltage display, to make sure I don't over-power my RAMPS 1.4.

I bought a cheap 0-30 volt LED voltmeter on eBay for less than $3 including postage (search for "0.36" LED Digital Voltmeter", and make sure to pick one which has the right voltage range for your power supply, as they come in 10V, 30V, 100V and 200V variants). Hook up the red and blue wires to the positive terminal and the black wire to the ground terminal, and you have a nice bright digital voltage display.

I then printed a voltmeter bracket which I came across on Thingiverse http://www.thingiverse.com/thing:239801, and it works great - now I get a brilliant indication of supply voltage as soon as I power up, greatly reducing the risk of blowing the RAMPS electronics. (And of course it works just as well when I am using the power supply for my other electronics projects.)


Thursday, 10 September 2015

Fantastic article on "Enchroma glasses, neuroscience, and the mystery of color"

I just came across this article entitled "What is color? Enchroma glasses, neuroscience, and the mystery of color" by Blake Porter:
http://www.blakeporterneuro.com/enchroma-neuroscience-color/

It's a pretty lengthy piece, but well worth taking the time if you have an interest in how the human brain perceives colour, what colour blindness is, and how the EnChroma glasses work. You might also want to participate in his survey after you've read through the article:
https://docs.google.com/forms/d/1VB4L7EQSkZ4M_IRrzjehXlMjToKTZcGQd3xKy3321cw/viewform

Porter's article explains the processes far more eloquently than I can. I've always been OK with Fire Engine Red, Canary Yellow, Sky Blue, and so on, but all of the intermediate and pastel colours have always been a problem, tending to blend into an undistinguished green-red-brown-pink-purple. Many colours that are dramatically different to most people are virtually indistinguishable for me.

The best description that I have been able to explain the EnChroma experience is like sitting in front of a well-adjusted colour TV, and then turning the “Colour / Saturation” settings up by about 25% – all the colours are “real”, but they become much more rich, vivid and saturated. Pastel shades which have very little colour intensity to my unaided eye now show much more saturation, with what were previously subtle differences between two shades now becoming much more distinguishable.

Green traffic lights are a good case in point – they've always looked white with a green tinge to my eye (like a fluorescent tube), but now they are definitely green. The other big “wow” factor for me is the sunset sky – I've always been vaguely aware of various shades of red, orange and pink at sunset, but they are generally very subtle and it’s only rarely bowled me over, but with the EnChroma lenses, every sunset is a delight! (I don’t know if this is what I've been missing my whole life, or of I'm seeing something that people with normal vision don’t see, but whatever it is, I really like it!)

But beyond the main EnChroma / Colour Blindness theme, there's some fascinating stuff about the impact of language and culture on our perception of colour. Did you know that the ancient Greeks didn't think the sky was blue? Or that there is a tribe in modern-day Namibia who can easily see the one square in the first pattern below which has a different shade of green (I sure can't), but struggle to see the blue square in the second pattern? Amazing stuff!


Wednesday, 2 September 2015

More musings on EnChroma sunglasses for colour blindness

It was a pretty big decision for me to go with the EnChroma sunglasses without having the opportunity of trying them first, but there are no dealers in Australia at present. However, I did a fair bit of research first, and took some comfort from the 30-day money-back guarantee (which I won't be using!)

I don't want to disparage other glasses which are advertised as enhancing colour blindness, as they may work well for many people, but I tried another brand a few years ago, and they didn't have a huge effect for me. (The EnChroma lenses are chalk and cheese in comparison for me). With respect to the technology aspect (narrow-band "notch" filters vs. "broadband" dye filters) - I don't know whether the benefits of narrow-band filters will apply equally to everyone, and I don't know whether any of the other brands are now using narrow-band filters - their website aren't always clear on the exact filter technology being used.

Narrow-band filters (as used in EnChroma) cut out a very specific "notch" of wavelengths (colours) while allowing very similar adjacent wavelengths to pass almost unaffected. Broadband dye filters (which is what the brand I tried previously  USED to use, but I am not sure about now) generally suppress a range of colours, but then a have smooth "shoulder" of rising transparency for the adjacent colours that you want to pass - think of it as a sheer-edged canyon versus a smooth river valley.

If I make a rainbow spectrum with a glass prism and look at it with the EnChroma lenses, there are two distinct dark lines in it, one in the Blue end, and one in the Red-Green end. See this shot which I took (yes, I'm a science geek!) which shows the effect:


I expect to see the same effect on natural rainbows (but I haven't seen any since I got the glasses) - they will presumably split into three coloured bands with a narrow gap between them.

I think this is why the EnChroma lenses work so well for me - the Red-Green "notch" drives a "wedge" between my Red and Green receptors, allowing my eye to see colours in the Red-Green range as either predominantly Red or predominantly Green, but it does have the side-effect of making a few colours that span right across the "notch" a richer, darker colour (drab olive greens and khaki colours tend to become richer in hue but darker).

The broadband dye  filters that I tried a couple of years ago don't have such a strong differentiating effect for me, but others may get a different effect (and they may have changed their lens technology in the last couple of years).

I think that the Blue notch in the narrowband  EnChroma filter is not particularly "useful" for enhancing my colour perception (as I am Red-Green colour blind), but it is also why some digital displays get a green cast - if the peak wavelength of the Blue pixel in the RGB display falls right in the "notch", then the Blue signal is heavily suppressed, and White on an RGB display with very little Blue signal tends to come out greenish. So far, it seems that some (but not all) outdoor digital signs have this effect, and OLED computer / phone / tablet displays in particular seem to have the effect, but LED computer screens and TVs seem to be fine. My guess is that the Blue pixel in those outdoor signs and OLED displays happens to fall right in the "notch", but other display types have a different spread of Blue in their RGB mix, so plenty of Blue still gets past on each side of the "notch".

I suspect that the exact narrow-band filter "notches" that EnChroma use on their Cx-65 Indoor / Computer lenses may be tuned differently, to avoid excessive tinting on digital displays (but I haven't tried a pair to be certain).

I haven't noticed any "weirdness" from the Blue notch in general viewing of "natural" objects - the sky is still sky blue, but maybe some very specifically coloured blue flowers might darken significantly? (I'm looking forward to Jacaranda season as a good test - Jacaranda trees in flower are an intense vivid colour to my unaided eye; I'll be interested to see if they change with the EnChroma lenses.)

Wednesday, 26 August 2015

So ... what does it actually LOOK like when you wear a pair of EnChroma sunglasses?

That's a tricky question to answer, because when you think about it, you don't know what the world actually looks like through my eye's (or anyone else's), and I don't know how you perceive all the colours around you. The world looks "normal" to me, even though I perceive it differently to you.

I've been wearing the EnChroma sunglasses http://enchroma.com/ for a couple of days now, and the best overall description I can provide is to imagine turning the colour down on your TV or computer screen until it's black and white, and then bring it back up to 6/10 or 7/10 - that's sort of what the world looks to my unaided eye - the colours are all there, but they're all a bit muted and subdued.

(Actually, that's NOT how the world looks to me, but it's the best simulation I can think of!)

Now turn the colour back up to "normal" viewing (10/10), and then take it up to 11:


THAT'S roughly what the world looks like to me through EnChroma - everything becomes more saturated, and just "pops".

The effect is most noticeable on pastels and other unsaturated colours - they all become richer, denser and more saturated. If a particular shade has just a touch of red, or green or yellow, it will seemingly "boost" the colour to make it several shades "richer". You know how an external painted masonry wall will fade over time, and all your favourite shirts fade with multiple washes? It's like giving the wall a fresh coat of paint, or buying a new Hawaiian shirt.

Bright, saturated primary colours aren't affected nearly as much - but I can see most of them clearly anyway. Fire engines and mail boxes are still "signal red", the sky is still sky blue, Hi-Vis Safety Shirts are still canary yellow. But when you think about it, most of the colours in the world around us are a bit more subtle and muted than that, and it's these unsaturated colours which seem to get the strongest boost.

There were a few surprises as well:

Green traffic lights have always looked almost white to my eye, with only the slightest hint of colour - a bit like how "warm white" compact fluorescent bulbs look compared to the "cool white" ones - but now they are bright green. Also, for the first time ever, red traffic lights are brighter than amber traffic lights, whereas the amber has always been quite a bit brighter than the red to my eye.

The EnChroma lenses can give a strong green cast to some (but not all) digital displays – my SmartWatch and tablet are now green when they should be white (both have OLED screens), and there's an LED display board near my work which is now green, but my TV and phone look pretty normal (but a bit dark!), and as I sit at my computer typing this reply, the white is just white.

Interestingly, the blue LED status lights that you often see on electrical equipment seems to be a colour that my unaided eye sees very brightly, but the EnChroma lenses seem to block very strongly. I noticed it first on our TV Set-Top Box and a computer monitor at home, and also on the lift buttons at work. Even though the lift is well illuminated and I can see fine with the glasses on, the floor button back-lights almost disappear completely when I put the glasses on. I guess it depends on the exact colour spectrum of the RGB pixels - it would be interesting to see if this effect persists with the Cx-65 lenses, which are apparently optimised for digital screens and the like.

Drab greens and browns (I'm thinking of colours that you would probably describe as faded olive green or mission brown) become a LOT more dense, and therefore get quite a bit darker - again, it's a bit like over-painting a faded fence with new paint which is a couple of shades darker. I think these colours must lie pretty well in the red-green "notch" in the EnChroma transmission spectrum.


I suspect things like army camouflage would be pretty strongly affected by this - but I haven't seen any army vehicles or personnel since I got the EnChromas. (Or maybe I did, but they disappeared totally against a dark background?)

Anyway, that's enough of a report for now - I've got to get back outside to look at some more flower beds. (And look for that Jeep that I misplaced somewhere.)


Tuesday, 25 August 2015

Spectroscopy of EnChroma Cx 15 lenses

I have taken a few spectroscopy images of the white light of a halogen bulb as viewed directly, and through a pair of normal (polarised) brown-tinted sunglasses,  and through the EnChroma Cx 15 lenses.

Here's the direct halogen spectrum,  unfiltered:


(Ignore the streak on the left-hand side -  the interesting bit is the rainbow on the right.) 

This is the spectrum as seen through the normal sunglasses - you can see that they suppress all wavelengths more or less uniformly:


And here's the view through the EnChroma lenses - you can see that they have two very distinct bands where virtually all light is blocked out,  while other wavelengths pass with very little attenuation :


I've also shot a short video showing the effect -  you should have no trouble working out when the normal sunglasses and the EnChroma lenses come between the light and the spectroscope:


"Color for the Color Blind" - A quick review of EnChroma Sunglasses

I'm severely Red-Green Colour Blind (technically, I have Deuteranomaly https://en.wikipedia.org/wiki/Color_blindness#Types, a genetically transmitted condistion). 

I’ve just acquired a pair of EnChroma Cx Explorer sunglasses, which are designed to boost colour perception for many people who suffer from colour blindness. (See http://enchroma.com/ ) 


The theory is that for people with normal vision, the Red receptors in the eye respond strongly to red, but only moderately to red-green colours, while the Green receptors respond strongly to green, but only moderately to red-green colours. For people with Red-Green colour blindness (which is my problem), the red and green receptors in the eye overlap in their colour reception, and both respond strongly to similar wavelengths in the red-green range, so they don't differentiate between red and green as well as a normal eye.

The EnChroma lenses effectively transmit red and green, but largely block the intermediate red-green colours, so the red receptors will be triggered strongly by red but not by red-green (which are blocked by the lenses), while the green receptors will be triggered by green but not red-green. 


Where these glasses differ from other products that I have seen advertised before is that these use narrow band-pass "notch" filters to cut out a very tightly defined band of red-green, whereas the more common type use pigmented dye filters, which filter out a wider and less clearly defined band of colours. 

(The EnChroma lenses also have a "notch" for blue-green, which could be beneficial for some forms of colour-blindness, but is probably not so important for me - although maybe it helps with the overall effect as well?) 

My pair arrived yesterday.

So - do they work? In a word:

YES!

They're quite dark (just 14% overall light transmission), so they're intended for full daylight use, not really suited for indoor use. If you're wondering - 14% transmission is pretty typical for a sunglass lens designed for full sunlight. E.g. Oakley provide a range of tints from 9% to 11% for "Extremely bright light", while 13% to 22% are rated for "Medium to bright light".

EnChroma offers three lens shades: 14% for "strong daylight", 25% for "medium-to-low light outdoor conditions" and brightly-lit indoor use, and 65% for general indoor / computer use. The 14% has the strongest colour-correcting effect, which is why I chose it.

In muted light this morning (7:30 am, a bit of light cloud / mist), the effect outdoors was obvious - a lot more contrast and definition between various shades of green and red in the garden.

But as the sun broke through - WOW!

Colours became quite eye-popping - our dry winter lawn became a vivid green, pastel flowers that always faded into the background suddenly stood out ...

The most dramatic difference was driving in to work - so, green traffic lights are actually green? Who knew?! J

(Green traffic lights have always looked almost white to my eye, with only the slightest hint of colour, but now they are bright green. Also, for the first time ever, red traffic lights are brighter than amber traffic lights, whereas the amber has always been quite a bit brighter than the red to my eye.)

Some unexpected effects - they can give a strong green cast to some (but not all) digital displays - my Android tablet is now green when it should be white, but my phone looks normal. There's an LED display board outside the Convention Centre which is now green, but as I sit at my computer typing this, the white background is just white. I guess it depends on the exact colour spectrum of the pixels.

I'll by trying to catch a spectrum tonight using my Public Lab Spectrometer http://publiclab.org/wiki/spectrometer - I'm expecting to pick up a couple of strong "notches" in the white light spectrum. I'll post here when I've captured a useful spectrum.


(For the sceptics: There is some “real science” behind these glasses, which differentiates them from other tinted sunglasses which have been promoted as "cures" for colour blindness – e.g. see: 

Friday, 14 August 2015

Affordable (Free!) 3D Modelling Software - A 5-Minute Review

When I started my adventures in the 3D printing world, I was using Alibre Design http://www.alibre.com/ as my main 3D modelling software. While I still have a valid Alibre licence, they have been taken over by 3D Systems (as you will see straight away if you click on the Alibre link above), and the software has morphed into "Geomagic Design", which has different features and licensing terms, and it has been increasingly difficult to migrate my Alibre licences onto new computers, running new operating systems. I thought it was time to look for a new CAD modelling software system to generate designs to feed my 3D printer.

There are many, many free and low-cost 3D modelling software options available, so where to start? Well, a good place is to list my must-haves and nice-to-have features:

Must-Have:

  • I am looking for something that will design "mechanical" components, rather than "free-form" modelling (i.e. a mechanical CAD system (MCAD), rather than an artistic "clay modeller")
  • Parametric modelling - e.g. the ability to edit a dimension and have the model "rebuild" itself (e.g. change the size and spacing of a group of bolt holes) 
  • True "solid modelling", not "surface modelling" capabilities - e.g. I need to be able to insert a hole or cut-away, and have the internal volume recognised as a solid rather than a void
  • Precision modelling capabilities - I need to be able to model to a fraction of a millimetre (even if my 3D printer's precision / tolerance are not quite up to the task sometimes!)
  • Familiar UI layout / functionality / workflow - I have used various MCAD software such as Alibre, Solidworks, etc for many years, and their UI and general functionality suits me, and I don't see any need to lean a completely new way of working to achieve the same goals; I realise I will need to learn new icons and menus etc, but I am looking for the same overall workflow concepts such as Create a Sketch / Extrude / Fillet / etc
  • Runs on Windows 10 (all of my home Windows machines have now been upgraded to Windows 10)
  • Exports models in STL format
  • 100% legal for personal / hobby use - I've been down the pirate software option, and I've used "extended trials" and "student licences" and so on, but I want to "keep it clean" from now on

Nice-To-Have:

  • Import / Export a variety of industry-standard CAD formats (e.g. IGES, STEP, etc)
  • Assembly Modelling (build assembles of multiple parts, to check fit and interference, etc)
  • Runs on other platforms (e.g. Chromebook, Android tablet, etc)
  • Will run without needing to "install" any software (I don't mind "installing" software on my own computers, but work policies prohibit the installation of software on the company's computers)
  • Legal for limited work-related use (I would sometimes like the ability to create simple models for finite element analysis )
Alibre Design still works very well for me, apart from the licensing / migration issues, so it's time for me to move on. SketchUp http://www.sketchup.com/ doesn't quite cut-it - it's a terrific package for what it does, but it falls short on the precision MCAD capabilities. After doing an exhaustive search (i.e. a few quick Googles), here's what I came up with for closer consideration:

Onshape


Onshape advertises itself as "the first and only full-cloud 3D CAD system that lets everyone
on a design team simultaneously work together using a web browser, phone or tablet" - and it seems to be true. Forget what you might think about Cloud software, and how slow it surely must be - Onshape has a pretty full set of professional modelling tools, and runs really well in a browser on even modest hardware such as a Chromebook, and it has native apps for iPad and Android tablets.

Onshape running in Chrome browser on Windows PC

Native Onshape app on Android tablet 

Capabilities include a wide range of import / export formats, assembly modelling, and so on. It's missing a few high-end features, but it is still undergoing active development (automatic 2D drawing generation is coming soon, for example).

The software designers come from the team that developed SolidWorks, and it shows in the toolset and UI design - if you have previous experience with professional MCAD software, you will feel at home very quickly.

What is truly remarkable, is that all of this capability is available free for hobby / personal use: https://www.onshape.com/features-and-pricing

You get access to ALL of the modelling tools for free - the only real limitation for the free account is the amount of Cloud storage space (5 GB for free accounts vs 100 GB for paid "Professional" accounts) - being a Cloud-based system, all of your models HAVE to reside on the Onshape cloud-store, but you can export models to your own file storage. 5 GB should be ample for all but the most ardent hobby modellers, though. In addition, you are limited to having 5 concurrent "Active" documents open at a time. For most hobby users, this won't be an issue - there is no limit on the total number of models you can have, but you may need to toggle some of them to be "Inactive" to free-up a new "Active" model. (Note that a "Document" can be a full assembly, with all of its parts, so you can have a lot of "Active" content at any one time!)

My only real reservation is that being proprietary software, there is always a chance that the owners might decide to abandon the free personal licence model at some future date, leaving me without free access to my models. However, their FAQ https://www.onshape.com/faqs suggests that there is no intention for this to happen, so I'll give them the benefit of the doubt:

Q:  Will Onshape ever change or restrict the Free plan?
A:  Although we cannot guarantee that there will never be additional differences between the Free and Professional plans, we expect that CAD modeling, drawings, and data management capabilities will continue to be fully available under the Free plan.

All in all, if you are looking for a good 3D modelling capability, you HAVE to take a look at Onshape!

FreeCAD


FreeCAD is a totally free, open-source 3D parametric modeller. It seems to be the best-developed open-source 3D MCAD modelling software I have come across, and it is still being actively developed and supported. As such, it has a large user community, and it is likely to be around for a long time to meet your needs. It is available on Windows, Linux and Mac, so will work for most PC users (but no Chromebook or mobile app as yet).

It's part-modelling capabilities arr pretty comprehensive (certainly adequate for my needs), and being open-source (with support for Python scripting), it has plug-ins / add-ons / extensions for a range of other software systems, such as Assemblies, 2D drawings, rendering, BIM / IFC, etc.

FreeCAD on Windows PC

In all honesty, I would have been perfectly happy with FreeCAD if it wasn't for the fact that it needs to be "installed" on Windows computers, which my work will not permit. I was looking for something that I could access occasionally at work, which is how I came across the cloud-based browser-accessible Onshape. However, if you're looking for 100% free, open-source 3D MCAD software, FreeCAD seems to be the pick of the bunch for now.

AutoDesk Fusion 360


The AutoDesk brand should need no introduction, but Fusion 360 might not be familiar to you. Basically, Fusion 360 is a professional-quality cloud-based 3D CAD/CAM tool, which supports both Mechanical and Free-form modelling. If you're familiar with Inventor, then you will understand Fusion 360. While it is a cloud-based service, it does require an application to be installed on your PC (Windows and Mac are supported) - it does NOT run in the browser, so other platforms (Linux, Chromebook, mobile, etc) are nor currently available options.

Fusion 360 UI on PC

The licensing model is rather unusual. AutoDesk has long offered free or very low-cost Student Licences, as long as you have a valid student ID, but these would expire after some period, and you would then be "strongly encouraged" to upgrade to a full licence. Fusion 360 is different:

As well as the traditional free 3-year Student licence, AutoDesk offers http://www.autodesk.com/products/fusion-360/try-buy a free 1-year "start-up license" for "hobbyists, enthusiasts, makers, and emerging businesses that make less than US$100,000 in revenue per year". At the end of the 1-year term, you can reselect the start-up entitlement as often as you want (and as long as AutoDesk continues to support this licensing model). 

If you are familiar with AutoDesk products (especially Inventor), and especially if you want 100% compatibility with an AutoDesk work environment for example, then Fusion 360 is well worth a look. If you don't have a history with Inventor and other AutoDesk products, you might find it a bit more than you need, but then you only need to learn how to use those parts of its comprehensive tool-set that interest you. Going with an AutoDesk product has the advantage that there is a huge global Inventor user-base, and you can pick up any number of "How To" books from your local book-store (most of which should also apply to Fusion 360), so getting training and support is a no-brainer. 

And since it's free and legal (for now, anyway), why not give it a try if your interest is piqued?

And the winner is ......

Well, for now, it's almost a dead-heat. 

I really, really like Onshape - it works well, offers ALL of the features I'm interested in, and is truly multi-platform. My only qualifiers are the fact that it is Cloud-based (so won't work without an Internet connection) if that worries you, and the fact that it is proprietary software, and they might change their personal / hobbyist licensing terms one day. (I'll probably keep using it as long as it's free). In my view, Cloud-based software is probably the way of the future, and I have access to an Internet connection almost all of the time. The ability to view / refine models on any device at any time is a real plus (e.g. put the finishing touches on a design using your tablet while you're on the bus home after work). 

Otherwise, FreeCAD will also stay in my portfolio - partly because it's very good, and partly as a back-up in the event that Onshape is no longer available to me. It does MOST of what I want, but it isn't quite as polished, and it won't run on all of my devices (I can't install it on my work computer or my Chromebook, and I can't access it on my Android tablet, for example).

In third place for me is Fusion 360 - but mainly because it's a bit of a sledgehammer to crack a walnut as far as my needs are concerned - but if you have a track record with AutoDesk software generally (and Inventor in particular), you may well want to take a look.

For now, I'll give a Points Decision to Onshape - I'll post an update after a few months use to let you know if my feelings have changed.