Thursday 26 April 2012

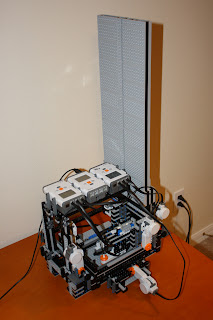
A 3D Printer made out of Lego ... that prints objects out of ... Lego!

This one has been around for a while, but I just came across it again, and had to share:

Here http://www.battlebricks.com/makerlegobot/ is a 3D Printer that's made out of 2,400 Lego pieces.


That is cool!

But what is even cooler is that instead of using PLA / ABS filament to print, it uses Lego bricks to make objects.


Awesome! Simply awesome!

Friday 16 March 2012

THAT'S not a 3D Printer!

(with apologies to "Crocodile Dundee")


THIS is a 3D Printer!


"3D Concrete Printing (3DCP) project was funded by EPSRC through the Innovative Manufacturing and Construction Research Centre at Loughborough University. 3DCP is a large-scale additive manufacturing process capable of producing full sized building components that gives architects a tremendous degree of design freedom because the components are manufactured directly from the architects’ digital model."


http://www.constructiondigital.com/green_building/3d-printing---the-future-of-concrete


Tuesday 13 March 2012

3D Printing & (micro) Formula 1

When I saw this headline on The Register
http://www.theregister.co.uk/2012/03/12/3d_printer_speed_nanotechnology

Speedy 3D printer creates 285um Formula-1 speedster

I had to take a look. I have a number of interests, but 3D printing and Formula 1 are high on my list, and anything that is "geeky" attracts my attention too, so a 3D-printed microscopic Formula 1 car is about as cool as it gets for me!


It seems that a team at the Vienna Institute of Technology  has pushed the technology of laser-cured polymers to new limits, both in scale and speed.

"Until now, this technique used to be quite slow," said Professor Jürgen Stampfl from the Institute of Materials Science and Technology in a statement. "The printing speed used to be measured in millimeters per second – our device can do five meters in one second."

OK, so they are only doing this on a microscopic scale (the Formula 1 car is less than a third of a millimetre long!) - but imagine when they can scale up - you could print yourself a full-size car in a  few minutes! 

Wednesday 22 February 2012

Visual Illusion - balls rolling uphill

 In response to a challenge on the Thingiverse Blog blog.thingiverse.com/2012/02/21/oo-someone-make-one-of-these/ I offer this attempt to design a part which will give the visual illusion of balls rolling uphill.


When viewed from the correct angle, this piece should give the illusion that all 4 ramps slope up to the middle platform. Viewing from any other angle gives the game away!  ( I haven't printed one yet, but I couldn't resist the challenge!)

Find it on the Thingiverse: http://www.thingiverse.com/thing:17948


Monday 20 February 2012

Do you want some inspiration for your 3D Printer project?

Check out this link: "The Man Who Prints Houses"
http://www.themanwhoprintshouses.com/Home.html


and the movie trailer here:

From the "About" page:

3D-printing is a method that physically realises digital designs layer by layer using a fluid substance that can be hardened by lasers or other binding agents. To date, it’s been used for small-scale manufacturing and as architectural maquettes. Enrico, however, has far grander plans.
...
Having built his printer – the world’s largest – from scratch, there’s no shortage of work offers for this highly-skilled and imaginative engineer. Throughout the course of the film, we see Enrico embark on an array of innovative projects: constructing the tallest printed sculpture in existence, working with Foster + Partners and the European Space Agency on a programme to colonise the moon, solidifying a sand dune in the desert, and printing the closest thing to an actual house: a small Italian dwelling known as a trullo.


I sure hope this movie makes it onto one of my local TV stations soon!

Thursday 16 February 2012

Lights ... Cameras ... Action!

One thing I’ve been meaning to do for some time is to rig up some sort of illumination for my printbed. The room where I do my printing is reasonably bright, but the X-Carriage and Extruder casts quite a shadow over the printing area, and it can be quite hard to see what is going on, especially if I am printing with filament which is similar in colour to the printbed (formerly blue painter’s tape, now red / orange for my Kapton-on-PCB heated printbed).

I’ve been thinking of hooking up a LED under the X-axis carriage; this could either be powered in parallel with the heating element (meaning it would switch on and off with the hot-end heater), or preferably, would have its own wires back to the power supply so it is always on. I hadn’t got around to working out what specification of LED(s) I should install, when I came across a cheap USB LED-Magnifier in a “Specials” bin at the local supermarket – only $4 for a really bright lamp with 18 LEDs in a ring, and a nice flexible “gooseneck” for positioning (and you can find similar items on the internet):

[Image copied from http://www.goodluckbuy.com/18-led-usb-flexible-light-lamp-laptop-notebook-with-4x-magnifier.html?&sl=en   – I forgot to take a picture before I hacked the lamp!]
This should cast a lot more light than a single LED, can be positioned to put the light wherever I need it (handy for cleaning out a jammed extruder!), and also has the advantage of not adding any mass to the moving X-carriage. I figured it should be pretty easy to hook it up to my RepRap power supply.

First, I cut off the USB plug (which was surprisingly difficult – the spiral wire which creates the “backbone” of the gooseneck is very tough!) and exposed the two wires – black for ground and red for 5 volts. Then, a bit of testing with my multimeter and adjustable DC power supply showed that the LED lamp draws about 180 mA @ 5 volts (and gives a really bright, uniform light in the process!) – OK for a PC USB port, but probably a bit too much load for 5 volt line on the Arduino.

The Arduino Mega is only rated at 40 mA per pin http://arduino.cc/en/Main/ArduinoBoardMega2560 , so I was concerned that connecting the light to the 5 volt rail could overload the Arduino, and I sure didn’t want to find out the hard way! However, my ATX power supply http://julianh72.blogspot.com.au/2011/08/my-parts-list-power-supply.html is rated at 500 W, so has plenty of capacity to power a little LED lamp on top of the existing load of the RepRap printer and heatbed.
I could have attached the lamp to the 5 volt binding posts on my ATX power supply http://julianh72.blogspot.com.au/2011/08/my-parts-list-power-supply.html , but this would have meant running an extra pair of wires from the power supply to the lamp – simple enough to do, but not very “elegant”. A tidier solution was to hard-wire the LED lamp to the incoming 12 volt supply, so the light would be “always on” whenever the RepRap is powered up. (The lamp has its own on / off switch, so I can turn it off if I want to.)

Of course, the lamp is designed to run at 5 volts, so I needed to step the voltage and current down to avoid blowing the lamp. A bit of basic maths suggests the effective load of the lamp at rated voltage is about 30 ohms, and that I would therefore need to add about 40 ohms in series to maintain a current of about 180 mA @ 12 V. I rummaged through my “box of bits”, and found a 100 ohm resistor, and the maths suggests the lamp should draw about 95 mA when run in series with the 100 ohm resistor @ 12 volts.

(I hope this maths makes sense – I’m a structural engineer, not an electrical engineer!)
Anyway, I hooked it up in series, ramped up the voltage to 12 volts, and turned it on – success! None of the magic blue smoke escaped, and the lamp lights up nicely (but not quite as bright as before – as expected). I guess my maths can’t be too far wrong after all!

So I soldered the resistor to the ground lead, wrapped the leads in heat-shrink and taped them to the gooseneck, and then fixed the gooseneck to the frame with cable ties, so that I can point the light where I need it. Finally, I wired the leads to the incoming 12 volt supply on my RAMPS:


So ... how does it work?

In a word – great! The following video shows how much easier it is to see what is going on while printing.

Wednesday 15 February 2012

It ain't Reprap, but it just HAS to be shared!

People are always accusing me of having geeky hobbies (RepRap, Arduino, etc), but this guy has me totally beat!


You may have seen the news items doing the rounds lately:


“Canadian Joe Murray excavates his basement with R/C earthmovers in just nine years”
(Check out the scale here - this is just a model under his house!)

There are some brilliant videos here:

or better still - check out his YouTube Channel:

I am just awe-struck - and SOOOO jealous!!!

Monday 6 February 2012

Doesn’t everybody love free stuff?!

Thanks to a posting on the RepRap forums http://forums.reprap.org/read.php?1,116843 , I was alerted to a limited-time offer to get some really top-class 3D modelling software for free.

Specifically, for a “limited period” (no, I’m not sure how long!), DAZ is making the Pro versions of DAZ  Studio 4 , Bryce 7 and Hexagon 2.5 available as free downloads, which can be fully registered. http://www.daz3d.com 

I’m not sure what the rationale behind this is, but I suspect DAZ is shifting their business model from selling software to selling content, and they need millions of users out there to sell their content to. (I expect to get lots of e-mail offers to buy and download model files, but I can live with that!)

In my previous tinkering with 3D software, I have come across Daz Studio (very similar in functionality to Autodesk 3DS Max etc), and Bryce (fantastic for creating "virtual landscapes"), but this is the first time I've seen the Pro versions offered for free. I’m not sure how relevant these packages are to RepRap (maybe you could print landscapes for your model railway layout?), but they're pretty interesting packages for anyone who likes playing with 3D software. (E.g. you could use DAZ Studio to create photo-real renderings of your digital creations before you print them.)

I haven't seen Hexagon before, but it looks like it might be a good tool for making "organic" models (such as "character figurines", animals, replicas of Henry Moore sculptures, etc). Most traditional CAD packages (like OpenSCAD, Inventor, Alibre, etc) are good at making mechanical components from geometric primitives (cubes, cylinders, etc), but are rather harder to use for "free-form" modelling (like sculpting with “digital clay”).

I suggest any one who is interested should download and register them all now (while the offer is still available) and give them a try. What have you got to lose (apart from possibly getting a heap of marketing material from Daz in your Inbox)?

Tuesday 31 January 2012

You wouldn't download a car ...

... or WOULD you?!

I think the whole issue of copyright, patents, intellectual property and 3D printing is a fascinating legal minefield in the making. If you thought the book, record and movie companies take extreme measures to protect their publications from illegal downloading and sharing, how do you think they will react when they realise you can not only download the movie, but also download the plans to make your own DVD player and TV? (OK, my RepRap isn't THAT powerful - yet - but in 10 to 20 years - who knows?) Or how will the car companies respond when you can download the design for a tail light lens, wing mirror, or ventilation grille, instead of paying hundreds of dollars to buy "The Real Thing" (TM The Coca-Cola Company). (Making replacement car parts is already a real possibility - e.g. check out http://www.thingiverse.com/thing:13071 )

Recent reports http://blog.thingiverse.com/2012/01/25/things-on-the-pirate-bay/ of how The Pirate Bay now hosts 3D files ("Physibles") https://thepiratebay.org/browse/605 left me rather bemused. Hadn't they heard about Thingiverse http://www.thingiverse.com/ ? But of course, there is a crucial difference:

So far, Thingiverse is all about people designing their OWN things, and sharing them freely. On the whole, the uploaded parts are people's own creations, although I am sure there are instances of designs which potentially infringe on someone's IP. (Are you even allowed to mention the name of a certain fruity telecommunications device when you create your own "iP*d Stand"  let alone "reverse engineer" the dimensions for a good fit, incorporating a receptacle for the patented connector, and then share it with the world, thereby depriving the company which designs and builds the tablet from millions of potential after-market accessory sales!) Thingiverse seems to understand the whole concept of copyright and intellectual property: http://www.thingiverse.com/legal

However, I suspect it is only a matter of time before copyright / patent designs are uploaded to The Pirate Bay, who will no doubt argue that they only host a file sharing service, and they are nor responsible for what people choose to do with it.

I came across a fantastic article on the whole subject: "It will be awesome if they don't screw it up" by Michael Weinberg (November 2010): http://www.publicknowledge.org/files/docs/3DPrintingPaperPublicKnowledge.pdf
Download a copy, share it with  your friends (with full attribution, of course!), and let me know what you think. As Michael Weinberg so eloquently concludes in his paper:


!"*'$.0$4":$.'$.0$+).'.+*-$<,)$',/*:E0$?@$2).%'.%($+,771%.':6$'1+9#/$
*4*:$ .%$ (*)*(#06$ "*+9#)02*+#06$ *%/$ -*306$ ',$ 9##2$ *$ 8.(.-*%'$
#:#$,%$'"#0#$2,-.+:$/#3*'#0$*0$'"#:$(),4;$!"#)#$4.--$3#$*$'.7#$
/'6+#%,2-5(64#.6&-5;#%+48$(0%6$#46,-+4#$!,6#$!0(#!"#@B>C#
<,)$?@$2).%'.%(;$=<$'"#$?@$2).%'.%($+,771%.':$4*.'0$1%'.-$'"*'$/*:$
',$,)(*%.K#6$.'$4.--$3#$',,$-*'#;$=%0'#*/6$'"#$+,771%.':$710'$4,)9$
(!#6485-(6#2!.%5;#,-160$#-+4#('6#28<.%5#-<!8(#('6#<6+67($#!"#
4./#02)#*/$*++#00;$!"*'$4*:6$4"#%$-#(*+:$.%/10').#0$2,)')*:$
J@#20%+(%+&#-$#-#'!<<;#"!0#2%0-(6$#-+4#$5!"Q-/$3#('6%0#5.-%,$#/%..#
<*--$,%$#*)0$',,$4.0#$',$/#0'),:$'"#$%#4$%#4$'".%(;
Damn copyright laws! The bugger has gone and put DRM in his download, so I can't copy and paste his words! I guess you'll just have to download the paper and find out for yourself what he had to say!
 

Tuesday 24 January 2012

Applying the Thumbscrews!

I have been having some problems with some of my prints ending up slightly skewed - the vertical axis on some prints has been slightly off-vertical. It took me a while to work out what was going wrong, and then I realised I had another issue - that my print bed needed levelling all the time, and I realised the issues were related: with all the adjustments I have made recently, I had ended up raising the print-bed quite a bit, and I didn't have a lot of compression left in the levelling screw springs. This meant some of the adjusting nuts were vibrating loose (needing constant readjustment), and the lack of compression meant the whole print-bed could rack over to one side, leading to off-vertical prints.

So, I needed a means of adjusting the levelling screws more easily, and so I could get some good compression in the springs, to keep everything nice and stiff.

The obvious answer was to install thumbwheels to make it easier to adjust each levelling screw quickly and easily.

Sure, I could have just downloaded someone else’s design like this http://www.thingiverse.com/thing:13807 or this http://www.thingiverse.com/thing:5246 or this http://www.thingiverse.com/thing:13065 – but where’s the fun in that? It's far more satisfying to design and print your own from scratch!

So I created a design in Alibre:


then I exported the STL:


And then I printed a set of 4 (in a single nested print).

They certainly make levelling my print-bed much quicker and easier. Will they stop it from vibrating out of alignment? I guess time will tell!

I have posted the design on Thingiverse in case anyone wants to make a copy: http://www.thingiverse.com/thing:16428

Monday 16 January 2012

At last - Vindication!

I have mentioned before http://julianh72.blogspot.com/2011/11/printing-without-computer-well-sort-of.html that while my kids think my RepRap Prusa Mendel is pretty cool, my "Significant Other" finds my whole RepRap obsession bemusing, to say the least. (But at least she knows where to find me - and it's not down at the pub!) She has been challenging me to "make something useful".

Well, last night, I did just that - and even she acknowledges it! Having returned from our holiday, our first action was to make good on our promise for the kids' Christmas present - we picked up a new Burmese kitten that we had chosen just before going away. Now, everyone knows that kittens like to play, and sometimes the best toys are things they just find lying around (ping pong balls, bits of string, the toilet roll hanging on the wall holder, etc). However, the opportunity to make a bespoke kitten toy was just too alluring.

A quick search for "cat toy" on Thingiverse turned up a few options: http://www.thingiverse.com/search?q=cat+toy&sa=Search

In particular, the "Mesh Ball in a Mesh Ball" looked like a great toy - and a great test of my RepRap's capabilities as well: http://www.thingiverse.com/thing:3493

So, I downloaded the stl file, and set it to print. A few hours later I had a really good model - and the cat loves it - it's just the right size and shape for a kitten to hook its paws in, and it makes a very pleasing rattle as it rolls around.


Happy New Year, everybody - and Happy RepRapping for 2012! May all your prints be awesome!