Thursday 29 September 2016

So I discovered a Wolf-Rayet star!

OK, I should admit right from the start that while I feel as though I have “discovered” a Wolf-Rayet star, it turns out to be very well-known to science, so I don’t think there is any chance that I will be invited to give it a name, less yet have it named after me!

(What’s a “Wolf-Rayet Star”? They are a class of extremely hot stars with unusual spectral signatures - while typical stars fuse hydrogen into helium, the Wolf-Rayets are busy fusing helium and heavier elements, so show bright emission lines for carbon, nitrogen and other heavier elements. Check out the Wikipedia article for a bit more information:  https://en.wikipedia.org/wiki/Wolf%E2%80%93Rayet_star )
So here’s the story of how it unfolded:

In my experimenting with backyard spectroscopy, I thought it would be interesting to capture a single spectral image with a group of several stars of comparable brightness but varying spectral classes, to illustrate the different spectral “signatures” side-by-side.

My first thought was to try a nice bright globular cluster, as there would be no shortage of stars - I aimed the telescope at 47 Tucanae (one of my favorite astronomical sights!), and grabbed a few spectra with varying exposures, but this turned out to be a bad choice for two reasons:

Firstly, there are simply too many stars (some millions of them), so all of the spectra just smear together into one fuzzy streak.

Secondly, like many globular clusters, it turns out that a very large fraction of its stars have very similar masses and compositions, so have very similar spectra, and the variation I was seeking to capture just isn’t there. (Sure, with a population of millions of stars, there are lots of “interesting” stars, but they are vastly outnumbered by the “boring” yellow G-class stars which make up the bulk of the population in 47 Tuc.)

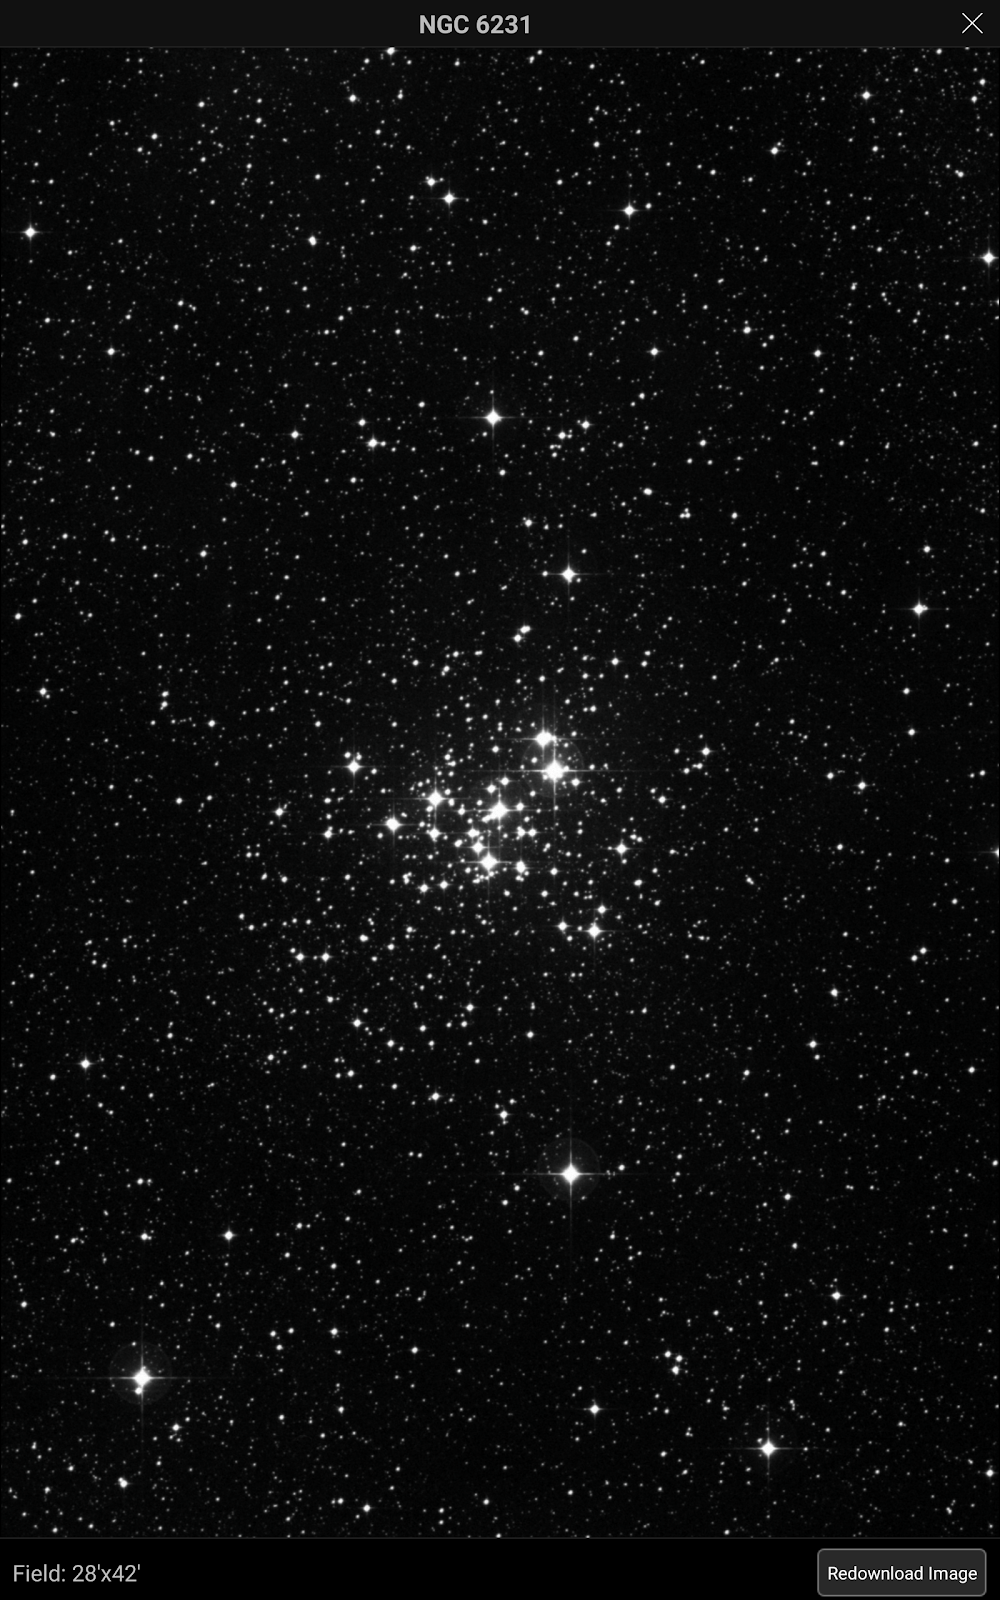
So what I needed was a small open cluster - small, because of the small capture area of my set-up (about 0.3 degrees wide x 0.24 degrees), and open, so that I might capture perhaps 10 comparably bright stars with their spectra, spread over the frame. A bit of a review of possible targets suggest NGC 6231 (a.k.a. Caldwell 76) as a good candidate - approximately 0.25 degrees across, and with a good spread of stars with Magnitude 6 to 7 approximately.

The following image is a DSS image of NGC 6231, showing an area of approximately ½ degree wide x ⅔ degree high (screen capture from SkySafari 5 Pro):

NGC 6231.png

So I aimed the telescope, focused the camera with Star Analyser SA100 grating, and captured the resulting spectra - and this is what I saw:

BrightStars_205913 C76_g4_ap13_conv.png

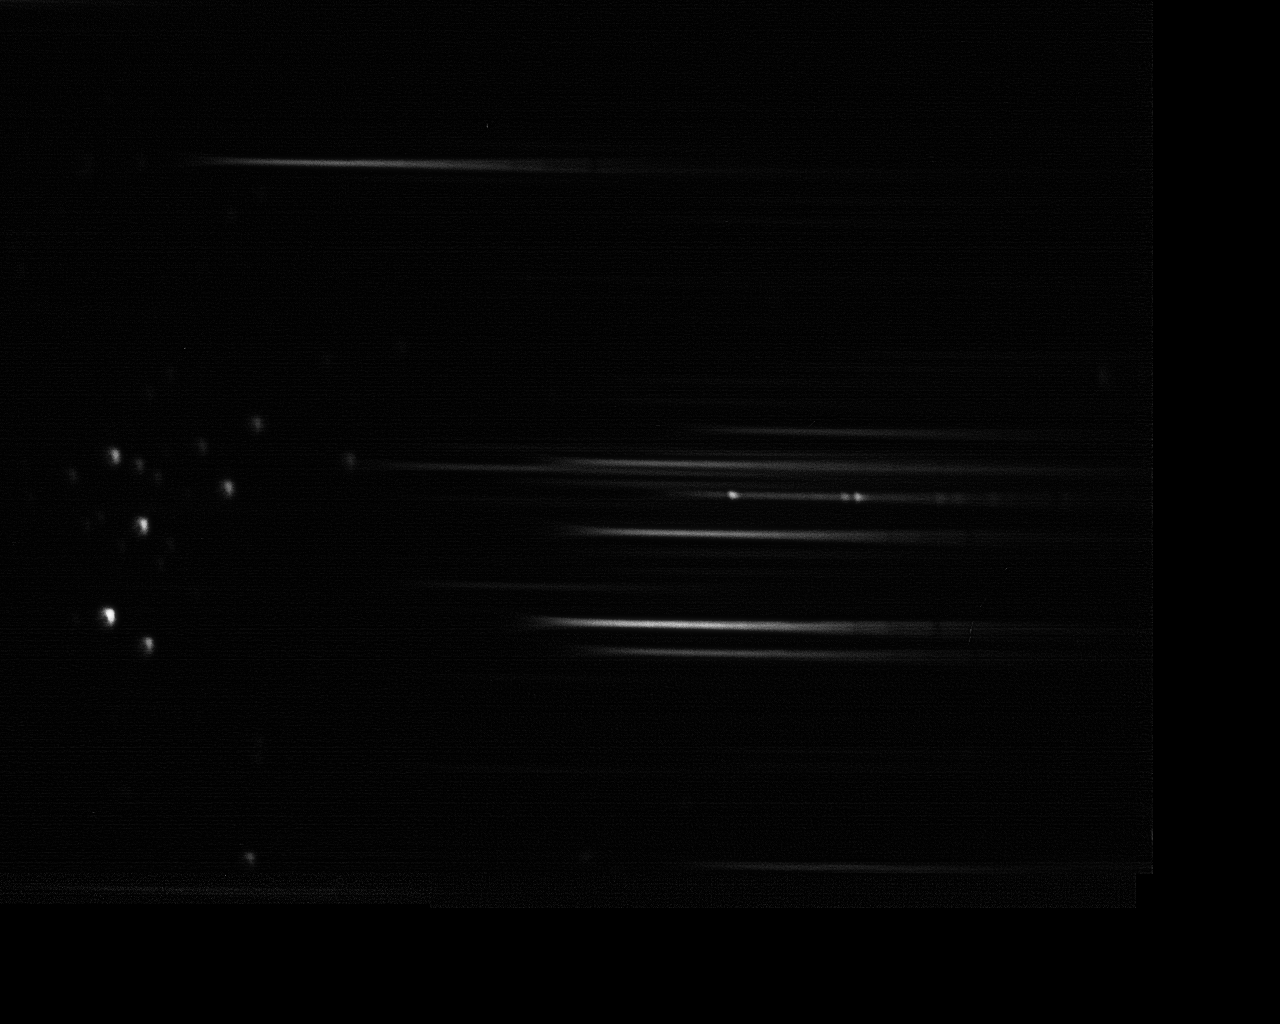
At a quick glance, you can see about 12 stars on the left side of frame, with their spectra on the right of frame. (Even more stars and spectra can be extracted with a bit of post-processing and enhancement.)

As I was hoping, you can see a few different stellar “signatures” - some spectra are longer than others, some show some strong absorption lines, and so on - perfect, just what I was hoping for!

But look at the spectrum of the bright star at the mid-height of the frame - it looks very different to the others. You can see that it has several intense bright emission lines - what could this mean?

The first thing I need to do is to extract the spectrum of the target star from the field, so that it can be analysed in isolation, without being “polluted” by the spectra of the neighbouring stars. There are a few ways to go about this, but one handy trick is to open the spectral image in your favourite photo editing software, draw a selection rectangle around the spectrum of interest, and copy and paste this into a new image. Then, resize the spectrum strip image to be just one pixel high (without changing the width) - this creates a 1-pixel high spectrum which averages the brightness of all the pixels that were in each column of pixels in the source image. Now, resize it again to about 30 pixels high, and you should end up with something like this:

HR 6265.png

(Note that all image editing processes of this type can introduce “artefacts”, meaning you are losing some of your source data, and introducing some spurious “data”, but this approach should help you to get a useful spectral image which captures the main features well, at the possible expense of losing some of the fine detail, or introducing spurious fine data.)

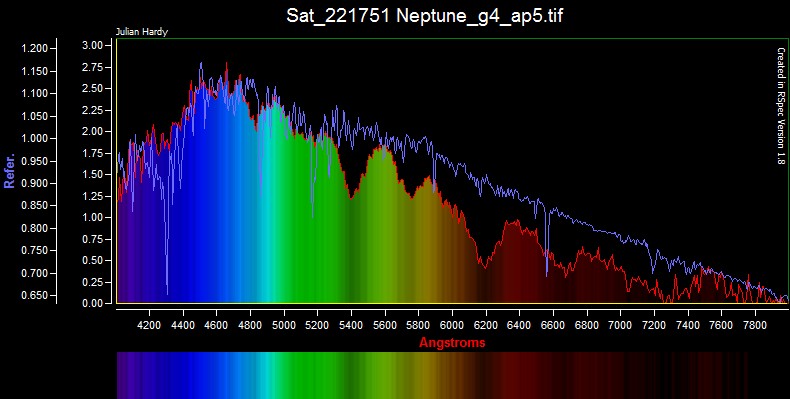
Now, I loaded my spectrum into RSpec, calibrated the wavelength scale, and corrected for instrument response, and we see the following spectrum:

HR 6265.png

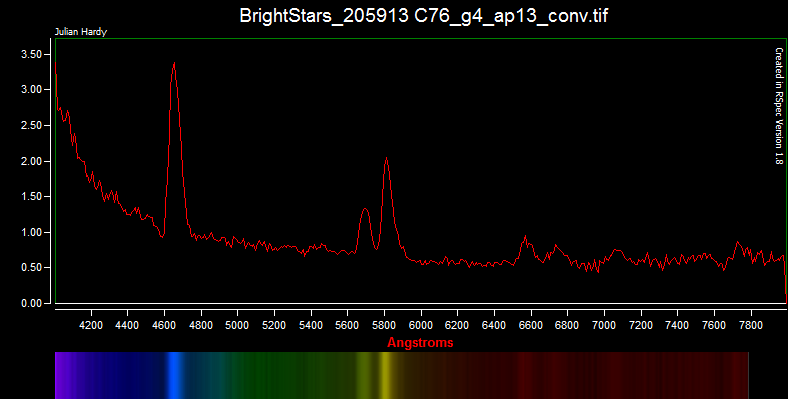
Yes, those bright points that I saw in the original image have come through as strong emission lines, at wavelengths of about 4650, 5690, 5810, 6560 and 6730 Angstroms.

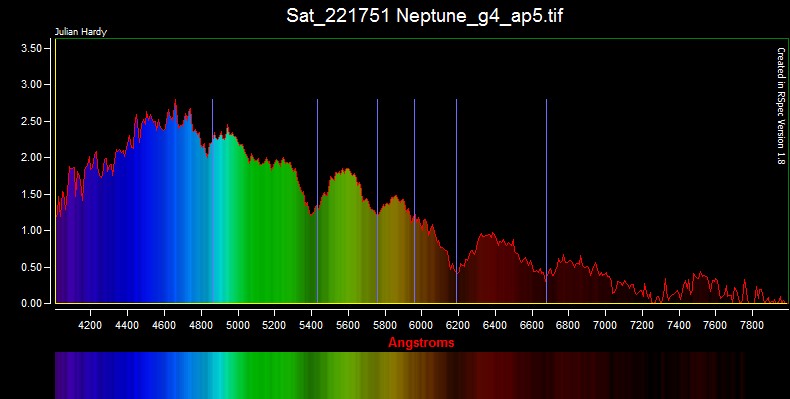
And when we superimpose the characteristic lines of a Class WC star, we see excellent correlation with 4 of the classic WC emission lines - the bright emission lines that I spotted correspond to Carbon emission at 4650, 5696 and 5805 Angstroms, and Hydrogen-alpha emission at 6563 Angstroms:

HR 6265 with WC Lines.png

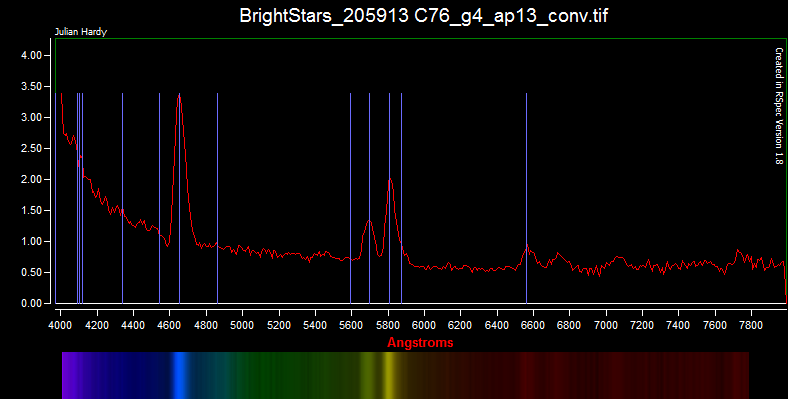
So - mystery solved - Open Cluster NGC 6231 (C 76) contains a Wolf-Rayet star, with Spectral Class WC!

This was an exciting “discovery” for me (even more so than my “discovery” of methane on Neptune! http://julianh72.blogspot.com.au/2016/09/methane-in-neptunes-atmosphere-from-my.html ), so I started doing a bit of research - and discovered that NGC 6231 actually contains at least three Wolf-Rayet stars: HD 151932 (Mag. 6.48), HD 152270 (Mag. 6.61), and HD 152408 (Mag. 5.82). https://en.wikipedia.org/wiki/NGC_6231

Sure enough, my “discovery” turns out to be the well-documented HD 152270 (a.k.a. HR 6265). Oh well - I guess my first real discovery will have to wait for another day!

Nevertheless, I hope this little story expresses some of the genuine thrill that can be found in doing “real science” in your backyard!

Monday 12 September 2016

Detecting Methane in Neptune's Atmosphere - from my Backyard!

I am capturing stellar spectra using a 200 mm Meade LX-90 telescope with 0.63 Focal Reducer (Effective Focal Ratio f/6.3), QHY5 mono camera, and a Star Analyser SA100 grating. The camera is mounted on a  “flip mirror” diagonal, which allows the telescope to be aligned visually with an eyepiece, and then the mirror is flipped out of the light path to the camera and grating.


IMG_20160910_004331.jpg


The following image is a stacked composite of 8 x 60-second frames captured on the evening of 25 August 2016 from my light-polluted backyard in suburban Brisbane (Australia). Neptune had an apparent visual magnitude of 7.8 at the time. (The exposure is reasonable, but for an improved quality spectrum for analysis, a longer capture session with a greater number of stacked frames would have helped.)


Neptune is at centre-left, with its spectrum spread across the centre of frame, and there are three other unidentified “field stars” visible in the frame. (Could the dim star just below and left of Neptune be Triton?)

Sat_221751 Neptune_g4_ap5 Cropped.jpg


There are some conspicuous dark absorption bands in the spectrum of Neptune - let’s see if we can work out what we’re looking at.

The spectrum image was loaded into the RSpec spectral analysis program, which reads the intensity of the image and produces a graph of intensity vs wavelength. (Note that even though the spectrum is captured in B&W, the software can synthesise the visible colours.)

Neptune - Stacked Frames - Uncorrected - With BW Spectrum.jpg


Neptune - Stacked Frames - Uncorrected.jpg


Note the “bell curve” shape of the spectrum plot - this is largely due to the varying sensitivity of the camera for different wavelengths. The camera is designed to capture visible light, with peak sensitivity in the green, diminishing sensitivity in the blue and red, very limited sensitivity in the Ultraviolet (< 4000 Å), and limited sensitivity in the Infrared (> 7500 Å).


When we calibrate for the Instrument Response, we get the following graph, which better represents the ACTUAL relative intensity of the spectrum across the range of visible wavelengths.

Neptune - Corrected.jpg


Neptune shines in reflected sunlight - and the Sun is a Class G2V star. When we overlay a classic G2V spectrum, we can see that the spectrum of Neptune broadly follows the same shape, but there are some conspicuous absorption bands which are not seen in the Sun’s spectrum - what could these be?


Neptune - Corrected - with G2v.jpg


Methane is commonly known for its absorption in the infrared (hence its significance as a Greenhouse Gas in the Earth’s atmosphere), but it also has a number of absorption / emission lines in the visible spectrum, at wavelengths of 4860, 5430, 5760, 5960, 6190 & 6680 Å.


When we overlay these lines on the spectrum, we see an excellent correlation. Bingo! Neptune’s atmosphere is confirmed to contain a significant amount of Methane!

Neptune - Corrected - with Methane Lines.jpg

This may not come as any news to experienced planetary scientists (I don't think NASA needs to launch a mission to confirm my “findings”!), but I find it quite astonishing what can be accomplished by a very inexpert amateur with very modest equipment in their backyard!

Thursday 26 May 2016

Yes, people really do 3D CAD on Mobile devices!

I've been using OnShape https://www.onshape.com/ as my primary 3D modelling package for some time now - both for designing parts for my hobby 3D printing and laser cutting, and also for general work (engineering) applications.


You can check out my early quick review here: http://julianh72.blogspot.com.au/2015/08/affordable-free-3d-modelling-software-5.html - and the more I've used it, the more impressed I've been.

I use OnShape primarily via Chrome browser on a Windows laptop (work or home) or a Windows tablet or a Chromebook, but I also use it on my Android tablet (and it is also available for iPads). What surprises many people is that OnShape can truly be used for full-featured 3D modelling (not just viewing) on mobile devices.


OnShape have just released a blog post "YES, PEOPLE REALLY DO CAD ON MOBILE!" https://www.onshape.com/cad-blog/yes-people-users-really-do-cad-on-mobile?utm_source=hs_email&utm_medium=email&utm_content=29936753&_hsenc=p2ANqtz-_jJNrK2qf9-xSiJlTvoqBOoscIhi_lDT2Vjq5p3JUpel2rp7KPKmYUU2SwkCkRlqVDaBJJ5WUiwAwE5vgIpQKm9UIODA&_hsmi=29936753 which gives some actual statistics which demonstrate that people really are using OnShape Mobile for modelling and design, not just viewing. While browser use is an order of magnitude bigger than mobile use (as you would expect), it is interesting to note that the usage patterns mimic each other on both platforms, except on weekends and holiday periods, where mobile use sees proportionately less of a dip than browser use - indicating it is the "platform of choice" for many users when you are away from the office.


If you are looking for a capable low-cost (free!) 3D modelling package for your hobby use, you really need to check out OnShape, if you have not done so already!

Thursday 14 April 2016

Some reasonable planetary images with my ZWO ASI120MC camera

While seeing wasn't great from my home in inner-western Brisbane last night (13 April), it was nice and dark and clear, so I set up my Meade 200 mm LX90 (GoTo Alt-Az mount) with ZWO ASI120MC (one-shot colour camera) http://julianh72.blogspot.com.au/2014/09/zwo-asi120mc-planetary-camera-quick.html, and fired off a few 30-second video captures with FireCapture, and then stacked and sharpened in AutoStakkert to get the best images that I could.

Jupiter was nice and high in the sky:


And the Great Red Spot came into view nicely later in the evening:


Mars and Saturn were fairly low in the sky, sitting in the sky-glow of Brisbane City to the east (and directly over my roof), so while I'm fairly happy with these shots, I hope to get some better images in a couple of months when they're a bit higher as well.


My best videos were taken without a Barlow - I just couldn't seem to get quite as sharp focus with my 2x Barlow. Maybe I need to try focussing with a Bahtinov mask on a nearby star before pointing at my target?

These are the best of last night's efforts - they may not rival Hubble, but I'm pretty happy with them.

Thursday 31 March 2016

Use your phone / tablet as a 3D printer?!

This 3D Printer concept uses your smartphone or tablet as the light source to cure photo-resins.


Virtually silent, runs off 4 x AA batteries.

And the best bit?

It's only $99 for the printer (build volume: 76 mm x 128 mm x 52 mm; vertical build rate of about 10 mm/hour or so), and $15 for a 100 mL bottle of resin (a range of hard and flexible resins available); prints with virtually no waste.

http://www.olo3d.net/
https://www.kickstarter.com/projects/olo3d/olo-the-first-ever-smartphone-3d-printer


I want one!

It sounds too good to be true - I'll believe this is a real thing when I see one actually working.

(But to quote “The X-Files”: I want to believe!)